








React Forms
Forms are everywhere in web applications — login pages, search bars, checkout flows, settings panels. You’ve already seen a few form examples in earlier posts, but now it’s time to dig deeper into how React actually manages form input, and understand the important distinction between controlled and uncontrolled components.
The Problem: How Does React “Know” What’s in an Input?
In plain HTML, form elements like <input>, <textarea>, and <select> maintain their own internal state — the browser keeps track of what the user has typed, and you only read that value when you need it (for example, on form submission).
React, however, generally prefers to keep the UI in sync with a single source of truth — usually your component’s state — rather than letting the DOM manage data independently. This leads to two different approaches for handling form inputs.
Controlled Components
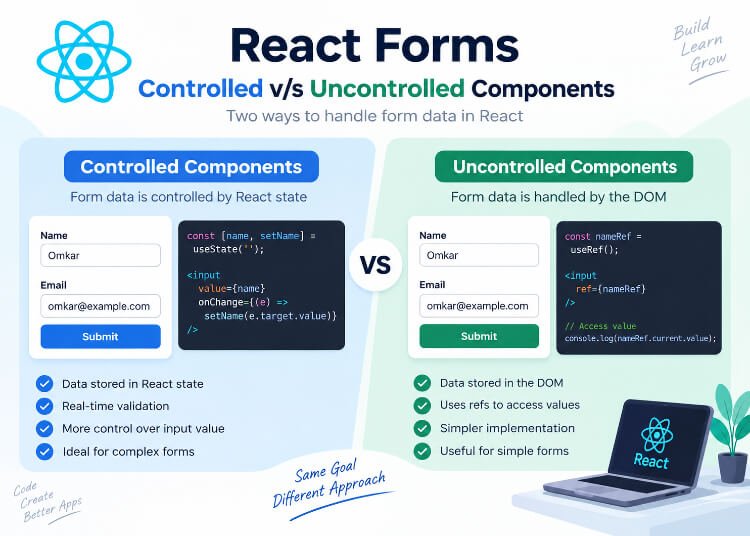
A controlled component is a form element whose value is driven entirely by React state. The input doesn’t manage its own value — instead, its value comes from state, and every change updates that state.
import { useState } from 'react'

function NameForm() {
  const [name, setName] = useState("")

  const handleSubmit = (event) => {
    event.preventDefault()
    console.log(`Submitted name: ${name}`)
  }

  return (
    <form onSubmit={handleSubmit}>
      <input
        type="text"
        value={name}
        onChange={(e) => setName(e.target.value)}
      />
      <button type="submit">Submit</button>
    </form>
  )
}
Here’s the pattern to notice:
value={name}ties the input’s displayed value directly to stateonChange={(e) => setName(e.target.value)}updates that state on every keystroke- Because the input’s value always comes from state, React is fully “in control” of what’s displayed
This is called a controlled component because React state controls the input’s value, not the other way around.
Why Controlled Components Are Useful
Since the input’s value lives in state, you get several practical benefits:
- Instant validation — you can check the value on every keystroke and show errors immediately
- Conditional formatting — you can transform input as the user types (e.g., auto-uppercase, character limits)
- Easy access to the current value anywhere in the component — no need to dig into the DOM
- A single source of truth — the UI and the underlying data are always guaranteed to match
Here’s an example showing real-time validation with a controlled input:
function EmailForm() {
  const [email, setEmail] = useState("")
  const [error, setError] = useState("")

  const handleChange = (event) => {
    const value = event.target.value
    setEmail(value)

    if (!value.includes("@")) {
      setError("Please enter a valid email address.")
    } else {
      setError("")
    }
  }

  return (
    <div>
      <input type="email" value={email} onChange={handleChange} />
      {error && <p style={{ color: "red" }}>{error}</p>}
    </div>
  )
}
Handling Multiple Form Fields
Managing separate state variables for every field gets repetitive quickly. A common pattern is to store all form fields in a single state object, and use one shared handler function.
function SignupForm() {
  const [formData, setFormData] = useState({
    username: "",
    email: "",
    password: "",
  })

  const handleChange = (event) => {
    const { name, value } = event.target
    setFormData({
      ...formData,
      [name]: value,
    })
  }

  const handleSubmit = (event) => {
    event.preventDefault()
    console.log(formData)
  }

  return (
    <form onSubmit={handleSubmit}>
      <input
        type="text"
        name="username"
        value={formData.username}
        onChange={handleChange}
        placeholder="Username"
      />
      <input
        type="email"
        name="email"
        value={formData.email}
        onChange={handleChange}
        placeholder="Email"
      />
      <input
        type="password"
        name="password"
        value={formData.password}
        onChange={handleChange}
        placeholder="Password"
      />
      <button type="submit">Sign Up</button>
    </form>
  )
}
Notice the key trick here: [name]: value uses a computed property name, based on each input’s name attribute. This lets a single handleChange function update the correct field in formData, no matter which input triggered it — as long as each input’s name attribute matches a key in your state object.
Handling Different Input Types
Checkboxes
Checkboxes use checked instead of value, and you typically read event.target.checked (a boolean) instead of event.target.value.
function NewsletterForm() {
  const [subscribed, setSubscribed] = useState(false)

  return (
    <label>
      <input
        type="checkbox"
        checked={subscribed}
        onChange={(e) => setSubscribed(e.target.checked)}
      />
      Subscribe to newsletter
    </label>
  )
}
Select Dropdowns
Select elements work similarly to text inputs — bind value to state and update it with onChange.
function CountrySelect() {
  const [country, setCountry] = useState("india")

  return (
    <select value={country} onChange={(e) => setCountry(e.target.value)}>
      <option value="india">India</option>
      <option value="usa">USA</option>
      <option value="uk">UK</option>
    </select>
  )
}
Textareas
Unlike plain HTML (where a <textarea>‘s content sits between its opening and closing tags), React treats <textarea>exactly like a text input — using a value attribute.
function CommentBox() {
  const [comment, setComment] = useState("")

  return (
    <textarea
      value={comment}
      onChange={(e) => setComment(e.target.value)}
    />
  )
}
Uncontrolled Components
An uncontrolled component takes the opposite approach — instead of syncing the input’s value with React state on every keystroke, you let the DOM manage the input’s value internally, and only read that value when you actually need it (typically using a ref).
import { useRef } from 'react'

function UncontrolledForm() {
  const nameInputRef = useRef(null)

  const handleSubmit = (event) => {
    event.preventDefault()
    console.log(`Submitted name: ${nameInputRef.current.value}`)
  }

  return (
    <form onSubmit={handleSubmit}>
      <input type="text" ref={nameInputRef} defaultValue="" />
      <button type="submit">Submit</button>
    </form>
  )
}
Notice the differences from the controlled version:
- There’s no
valueoronChangetied to state ref={nameInputRef}gives you direct access to the actual DOM nodedefaultValuesets the initial value (instead ofvalue, which would make it controlled)- The value is only read when needed — in this case, at submission time via
nameInputRef.current.value
We’ll cover useRef in much more depth in an upcoming post, but for now, just know that refs give you a way to directly access a DOM element without going through React’s state system.
Controlled vs Uncontrolled: Side-by-Side Comparison
| Aspect | Controlled Components | Uncontrolled Components |
|---|---|---|
| Source of truth | React state | The DOM itself |
| Value binding | value + onChange | ref (value read on demand) |
| Real-time validation | Easy | Harder — requires manually reading the ref |
| Re-renders on every keystroke | Yes | No |
| Code complexity | Slightly more boilerplate | Less code for simple cases |
| Recommended for | Most forms, especially with validation | Simple forms, file inputs, third-party DOM libraries |
Which Should You Use?
For the vast majority of React applications, controlled components are the recommended default, since they keep your UI and data perfectly in sync and make validation, conditional logic, and dynamic behavior much easier to implement.
Uncontrolled components are still useful in specific situations:
- File inputs (
<input type="file">) are inherently uncontrolled in React, since their value can’t be set programmatically for security reasons - Simple forms where you only care about the final submitted values, not real-time updates
- Integrating with non-React code or libraries that expect direct DOM access
function FileUpload() {
  const fileInputRef = useRef(null)

  const handleSubmit = (event) => {
    event.preventDefault()
    const file = fileInputRef.current.files[0]
    console.log(file)
  }

  return (
    <form onSubmit={handleSubmit}>
      <input type="file" ref={fileInputRef} />
      <button type="submit">Upload</button>
    </form>
  )
}
Common Mistakes Beginners Make
- Mixing controlled and uncontrolled patterns — for example, providing both a
valueand areffor the same input without understanding the interaction, or setting an initialvaluewithout anonChangehandler (React will warn you about a “read-only” field in this case). - Forgetting the
nameattribute when using a sharedhandleChangefunction across multiple fields, causing state updates to target the wrong key. - Directly mutating the state object instead of spreading it (
{ ...formData, [name]: value }), which we covered as a rule back in the state management post. - Overusing refs for things state could handle more idiomatically, missing out on validation and reactivity benefits.
- Forgetting
event.preventDefault()in the submit handler, causing an unwanted page reload.
Recap
In this post, you learned:
- The difference between controlled and uncontrolled components in React
- How to bind input values to state using
valueandonChange - How to manage multiple form fields with a single state object and shared handler
- How to handle checkboxes, select dropdowns, and textareas as controlled inputs
- How uncontrolled components work using refs, and when they’re a better fit than controlled ones
Forms are a great segue into two topics we’ve been referencing but haven’t fully explored yet: Hooks in general, and useRef specifically. In the next post, we’ll zoom out and properly introduce React Hooks, starting with the two you’ve already used the most — useState and useEffect.


